
Linux Kernel Compilation Guide
Linux kernel is one of the largest human-made codebases and it is considered one of the most complex piece of code as well. If you are a Vulnerability Researcher interested in doing research on Linux kernel, the first step is to be able to compile it and optionally add debugging symbols and other info that will reduce your misery while debugging exploits and understanding the behemoth Linux kernel.
SUMMARIZE WITH AI


- May 28, 2025
.svg)


Linux kernel is one of the largest human-made codebases and it is considered one of the most complex piece of code as well. If you are a Vulnerability Researcher interested in doing research on Linux kernel, the first step is to be able to compile it and optionally add debugging symbols and other info that will reduce your misery while debugging exploits and understanding the behemoth Linux kernel.
This guide is targeted at exactly that. Although the information can also be applied to Linux compilation for other purposes, it is mainly targeted at researchers looking to start research on Linux kernel via n-day analysis of CVEs.
Prerequisites
- A machine powerful enough to compile Linux kernel
- Basic knowledge of Linux command line
Environment
The environment used in this guide is Ubuntu 22.04 LTS. You can use any other Debian-based Linux distribution as well. This environment can be on a physical host, in a docker container or on a cloud provider.
Linux Kernel
A kernel is the core piece of code of an Operating System (OS). It handles all inputs, outputs and processing aspects related to Disk, Memory, Network, Display, Sound, Touch and other peripheral devices. It is also called ring-0 software based on the ring privilege model.
Kernels come in a range of architectures. Linux kernel is a monolithic kernel that is extendable via Linux Kernel Modules (LKMs). A monolithic kernel runs all OS services along with the main kernel thread, sharing memory with the kernel thread. This approach provides rich and powerful hardware access to both the kernel and other OS services.
N-day vulnerability
N-day means the exploitation of a CVE after its information has been publicly available for awhile. CVEs are found in the core kernel subsystems as well as drivers/LKMs. You will need avulnerable version of the kernel and the driver, if the bug was found in a driver.
The example CVE for this guide will be DityCOW CVE-2016-5195.
Determine the vulnerable versions
In order to determine the vulnerable version of kernel for the target CVE, search the CVE on NIST NVD. After the search, look at the Known Affected Software Configurations. You will find a list of Linux kernel versions that are vulnerable to the searched CVE, like follows:

Based on the above picture, you can see 4.8.2 is the latest vulnerable kernel for DirtyCOW.
Download the vulnerable source
You can download the source code for the your selected vulnerable version of Linux kernel from this directory by first selecting the right series ( v4.x in this case) and then selecting the tarball of the version
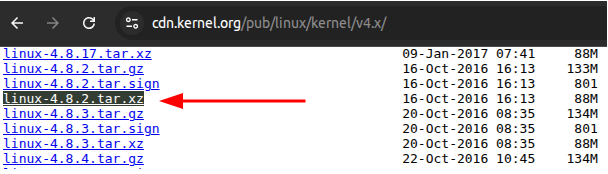
Take care not to download the *.sign files, they don't contain any code. They are used toverify integrity of the archive file.
Exact the tarball using tar xf linux-<version>.tar.xz and change directory into theextracted source.
Compilation
Required tools
The required tools for the compilation can be installed using the following on a Debian-based system:
sudo apt-get install git fakeroot build-essential ncurses-dev xz-utils libssl-dev bc flex libelf-dev bison
Configuring the kernel
This is the step that varies for each CVE. Each CVE requires a set a configurations to be enabled in order to hit the vulnerable path with favorable conditions. If the bug is in a core subsystem, you probably won't need special configuration (e.g., DirtyCOW is a bug in the Memory management subsystem). But if the bug is in a different subsystem or a driver, you will need to enable configurations that include the vulnerable path.
There are two ways to solve this:
- Find the exact configurations required by trial-and-error or some other method
- Use your distribution's config
Whenever in doubt, just use your distribution's config by running the following command. It will(probably) include the vulnerable path. You might have to remove some configs if you arebuilding an old Linux kernel version.
cp -v /boot/config-$(uname -r) .config
But if you like to live the hard life, do make defconfig in the extracted source folder and start guessing the configs required after running make menuconfig . I generally backtrack from the vulnerable function, noting the required preprocessor definitions in the path. This gives a good idea of what configurations should be enabled.
If a configuration doesn't work, you will have to debug the kernel to know where exactly it breaks the path and review the corresponding source to find the configuration required. There's no other way.
Configurations useful for debugging
# Generates a kernel with debugging info
CONFIG_DEBUG_KERNEL=y
CONFIG_DEBUG_INFO=y
CONFIG_DEBUG_INFO_DWARF_TOOLCHAIN_DEFAULT=y

# Makes the kernel debugger friendly
CONFIG_GDB_SCRIPTS=y
CONFIG_KGDB=y
CONFIG_FRAME_POINTER=y

# Makes the kernel qemu friendly
CONFIG_VIRTUALIZATION=y
CONFIG_KVM=y

# Enables runtime Function tracing using ftrace
CONFIG_FTRACE=y
CONFIG_FUNCTION_TRACER=y
Debian keys error
If you use a Debian-based machine's config for building the kernel, you will likely run intofollowing error for Debian keys:
No rule to make target 'debian/canonical-certs.pem
You can fix this by running the following commands in the kernel source directory:
scripts/config --disable SYSTEM_TRUSTED_KEYS && scripts/config --disable
SYSTEM_REVOCATION_KEYS
Compile
To start the compilation, run the following command:
make -j$(nproc)
The time it takes to compile the kernel varies based on your machine and configuration.You can also build only the boot image bzImage or the modules using make -j$(nproc)bzImage and make -j$(nproc) modules respectively.
This will also generate a vmlinux file in the kernel source directory. This is the ELF file (withdebugging symbols) of the kernel. When attaching gdb , you should use this file for thesymbols.
INSTALL_PATH
After building the kernel, you can place the boot image bzImage and the config in a separatedirectory by setting the INSTALL_PATH variable to the destination directory path and runningmake install , e.g.,
make INSTALL_PATH=build install
NOTE: you have to create the destination directory before executing this command
INSTALL_MOD_PATH
Similarly, for placing the built modules in a directory from where they can be loaded, you need to set the INSTALL_MOD_PATH variable to the destination path and run make modules_install , e.g.,
make INSTALL_MOD_PATH=build modules_install
INSTALL_HDR_PATH
Similarly, you can place the UAPI header files required for building external modules against the compiled kernel using the INSTALL_HDR_PATH variable:
make INSTALL_HDR_PATH=build headers_install
A note for compiling old kernel versions
When compiling old kernel versions (like 4.8.2 ) on a modern Linux distribution can lead to weird issues in compilation. For example, during one of our builds, we built the 4.8.2 on a Ubuntu 24.04 LTS machine. The generated boot image kept boot looping with qemu with no error message or indicator of the underlying issue. In such cases, we recommend using a docker container (given below) for doing the compilation with a Ubuntu version that was the LTS version when the kernel version was released. For the 4.8.2 build, we used Ubuntu 16.04 LTS version
FROM ubuntu:16.04 # Replace with your version

RUN apt-get update && apt-get install -y fakeroot build-essential ncurses-dev xz-utils libssl-dev bc flex libelf-dev bison

WORKDIR /kernel

ENTRYPOINT mkdir -p build && make olddefconfig && make -j$(nproc) && make INSTALL_PATH=build install && make INSTALL_MOD_PATH=build modules_install && make INSTALL_HDR_PATH=build headers_install
Config the kernel on the host and run the following commands to compile the kernel using docker:
docker build -t kernel_builder . && docker run --rm -v ./linux-
<version>:/kernel kernel_builder
Conclusion
In this blog, we looked at the requirements to build Linux Kernel, how to identify vulnerable versions for CVEs, some useful configurations for debugging and testing and finally building Linux Kernel, both on host and using docker with putting the artifacts in a single place.
In the next blog, we will look at other parts of the toolchain that are required to have a complete debugging and exploit development setup for N-day exploitation.
SUMMARIZE WITH AI
.png)

.png)
